

At the moment I am finishing up a baby blanket for a friend's baby shower. Once I am done that I have a scarf I want to complete. Perhaps it will be done in time for the cooler weather. After that I want to attempt a sweater for myself. I've never done an adult sweater before so it should be interesting. I have a few patterns I'm looking at. Just need to pick one and buy some fabulous yarn for it.
Wednesday, August 5, 2009
Hello? Is anybody blogging?
I need to get better about updating my blog. I've been working on lots of projects in the past few months and have many others that were finished before that. Hopefully I will be able to get them posted up here for ya'll to check out.
Tuesday, April 14, 2009
Monkey Hat and Blanket
 Li'l Monkey Baby Hat and Matching Afghan
by Carmen Watkins
from Stitch 'N Bitch Crochet: The Happy Hooker
I made this super cute set for my son. I worked it up when I was pregnant and couldn't wait until he was here to see him in his super cute monkey hat. Unfortunately, until recently the hat was too big. :( But now he wears it with pride. Who wouldn't want a sock monkey on their hat?
I used a 5.0 mm (H) hook and a 9.0 mm (M/N) hook as the pattern called for. I also liked the colors of the blanket from the book that I used the exact yarn and colors as suggested in the pattern. (Which I don't usually do - I usually pick my own colors or ones that are close enough.) I had to order the yarn online because I couldn't find the exact colors in any local yarn or craft store. I found them at http://www.herrschners.com/ which offers yarns at discounted prices most of the time.
The yarns used were:
Bernat Softee Chunky Solids & Marls: Berry Red (2 skeins)
Bernat Softee Chunky Solids & Marls: Berry Red (2 skeins)
Bernat Softee Chunky Solids & Marls: Natural (1 skein)
Bernat Softee Chunky Solids & Marls: Rodeo Tan (2 skeins)
Bernat Softee Chunky Solids & Marls: Rodeo Tan (2 skeins)
This pattern wasn’t too hard to follow. But I did find it a bit tedious to do. I had never done granny squares before and I didn't anticipate how long it would take to complete all the squares even though they were easy to do with the chunky yarn and larger hook. Sewing the squares together was a new skill and proved more difficult than I thought. Next time I do granny squares I anticipate it to be easier to put together. I didn't line them up quite right at first and had to go back a couple of times to re-do the sewing. I also found it frustrating to weave in all the ends of the yarn in each square from the color changes. I would think I had them all and then another inspection would turn up more ends to be woven in. I will have a better system in mind when I attempt granny squares again and I'm sure it will go much smoother.
The hat was super easy to work up and came out so cute. The monkeys were also easy to make. I think I would make the monkey on the hat a bit smaller next time as it seems to overwhelm the hat and my son's head when he wears the hat. If you wanted to make the hat a bit more girly, the pattern offers a scalloped edging instead of the plain straight edge.
All in all, this was a cute project to work on and I like how it turned out.

Saturday, March 28, 2009
Cutie Booties
 Saartje's Bootees
by Saartje de Bruijn
from Saartje Knits
I made these adorable knit booties for my niece.
I used a size 3 needle and made the larger size. The yarn I used was Lion Brand Wool-Ease Solids & Heathers from my stash. I don't remember the color names.
They were super easy to make and knit up quick. I made them while I was visiting my parents in Florida.

Friday, March 13, 2009
Humpback Whale

I was so excited when I found this pattern on Ravelry. When I found out my friend was pregnant, I wanted to make a whale for her because we took a Marine Mammals course together.
This was an easy pattern to follow. It took me awhile to finish because I had to take time to make sure each stitch was very tight. The sts had to be tight so that when you stuffed the whale, the stuffing wouldn't poke through.
I used safety eyes instead of sewing on beads as this was for a baby.
The detailing was probably the toughest part. It was difficult to get the mouth and ventral grooves just right. Especially because it was hard to see both sides of the head at the same time to make sure the mouth was even all around.
I used black embroidery thread for the mouth and a lighter blue yarn for the ventral grooves. Next time I make this, I will use embroidery thread for the grooves. The yarn was just a little too thick and it made it hard to fit the 5 lines.
The tail came out a bit bigger than I anticipated. I think this is because I didn't crochet as tightly as I did for the body.
This was fun to make and I will be making another one for my friend who is due in August with her first baby. She is a marine science teacher and will definitely appreciate this cute humpback whale.

Thursday, March 12, 2009
Fat Bottom Bag
 Fat Bottom Bag
This bag was fairly easy to crochet. It only took me about a week to finish it and that was in my very limited spare time. The main stitch was a herringbone half double crochet (hhdc) which I hadn't done before. It was easy and gives the bag a nice pattern.
Before starting the handles, I added a lining to the inside to give it more structural support.
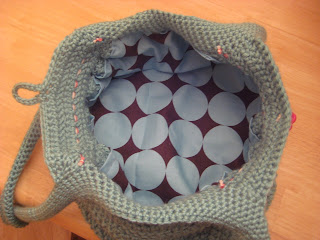
I followed the directions as if I was going to add solid, circular handles like the pattern called for. But instead of adding circular handles (I didn't find any that I liked), I crocheted longer straps onto the bag. Actually, longer straps are more practical for me as they keep my hands free while wrangling two kids.
To make the straps, I crocheted into the sides of the bag and the sides of what was supposed to be the original handles. The straps are 6 rows of single crochet (sc). Each strap is about 80 sc stitches (sts) (not counting the stitches that are joined to the bag itself). You could adjust the number of sts to make the straps any length you desire.

I also added a button and button loop to keep the bag closed when in use. The button loop is 2 rows of 12sc.
The final touch was a stripe of pink and white yarn. I wove the two pieces of yarn through the bag on both sides.

I used it the other night and it held all of my stuff without a problem (wallet, cell phone, lipstick, keys, gum).
It is a quick project and would make an excellent gift for someone.
Wednesday, March 11, 2009
Let me introduce myself
I am a stay-at-home mom to two wonderful kids (a 3 year old daughter and a 2.5 month son). We spend our days navigating playgroups, combing the library, hanging at the zoo and running errands. When at home we like to play pretend, draw and paint, do crafty things (the kind with scissors and glue), and run laps around the house (well, the 3-year old does anyway).
I am a high school biology teacher by trade and taught in a local high school for 4 years before trading in my 120ish students for my 2 kids. Just last May I finished my Masters in the Art of Teaching Biology. It was hard work and very fulfilling.
In my spare time (what little of it there is) I like to read, row whaleboats, do some simple sewing, and watch too much TV while knitting or crocheting.
I started knitting about 4 or 5 years ago when at a crafty night with friends I was taught the art of the yarn. I finished scarves and moved onto less rectangular projects like hats, booties and blankets [squares - much different than rectangles ;) ].
After venturing into a local yarn shop while visiting a friend in New Hampshire and picking up the book "A to Z of Crochet: The Ultimate Guide for the Beginner to Advanced Crocheter," I became hooked (yes, I know - but I love the punny-ness of it) on crochet. I have completed crochet projects such as hats, blankets, a sweater, stuffed toys, and a purse.
Now I find that when I have a spare moment, I look around for my hook and yarn. I'm always planning my next project and working my yarn stash.
My goal for this blog is to showcase and discuss my yarny crafts, as well as some of my sewing projects. I hope to be able to look back on past projects and see my progress in my quest to be a better yarnster.
I am also a member of Ravelry. Find me and friend me (user name: toritopia). I'd love to see your yarny & fabric crafts too!
Enjoy!
Subscribe to:
Posts (Atom)
